The Western Cape is no stranger to dry spells – and in January 2026, many residents felt the impact of low rainfall and restricted supply. A DIY rainwater harvesting system can give homes resilience, reduce dependence on municipal water, and cut bills. Here’s how to set one up, specifically for Western Cape conditions.
1. Why Harvest Rainwater in the Western Cape?
- Mediterranean climate: winter rains, dry summers
- Municipal restrictions during drought
- Cost savings & water security
- Supplement garden irrigation, laundry, toilets
Rainwater harvesting captures precipitation from rooftops – storing it for later use.
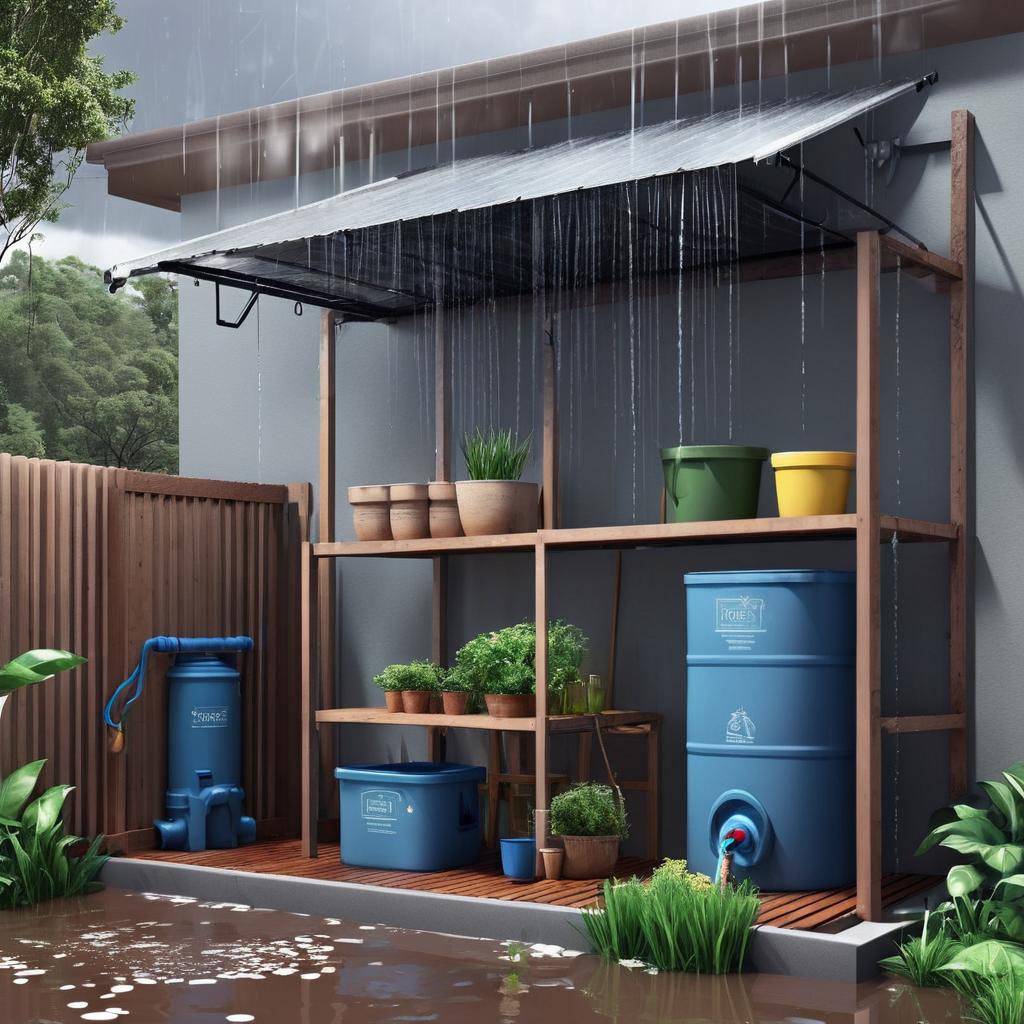
2. Basic Components of a Rainwater Harvesting System


4
2.1 Catchment Area
Your roof is the primary surface that collects rainwater.
- Prefer smooth, non‑toxic materials (metal roofs are excellent)
- Avoid asbestos and old tar sheets
- Larger roof = more water captured
Rainwater yield formula:
Roof area (m²) × rainfall (mm) × 0.8 (efficiency factor)
Example:
50 m² roof × 300 mm rain × 0.8 = 12,000 L/year
2.2 Gutters & Downpipes
These direct water into storage.
- Use wide gutters (150–200 mm recommended)
- Add leaf guards or mesh to reduce debris
- Maintain slope for proper flow
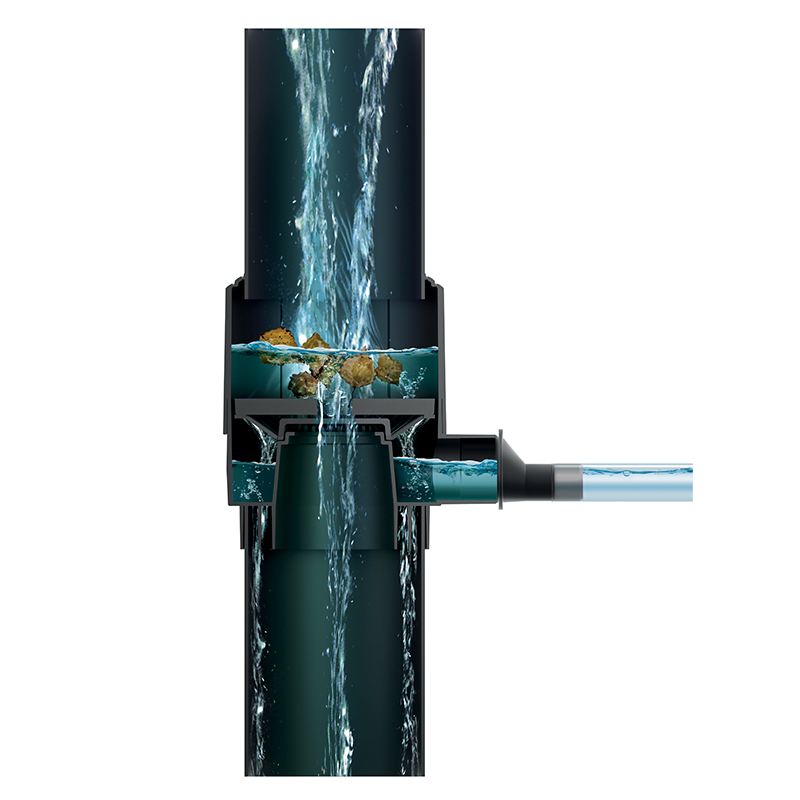
2.3 First‑Flush Diverter
This device routes the first dirty water away from your tank, keeping water cleaner.
- Critical in dusty, dry environments like Cape Town
- Easy DIY version: a small PVC pipe with a cap that fills first and diverts initial runoff
2.4 Filters & Screens
Keep leaves, insects, and debris out.
- Mesh screens at gutter inlets
- Fine filters before tank entry
- Consider charcoal filters if using for washing
2.5 Storage Tanks
Choose based on need, space, and budget:
- Above ground: Easier installation
- Underground: Saves space, cooler water
- Material: Polyethylene, fibreglass, concrete
Size rule of thumb:
Aim for 2–4 months’ worth of water for critical uses.
2.6 Pump & Delivery System
To use stored water effectively:
- Low pressure: gravity feed to garden/yard
- Higher pressure: add a booster pump for toilets/laundry
3. Step‑by‑Step Installation
Step 1 : Plan Your System
Check your roof area, typical rainfall, and intended use.
Make a simple sketch:
- Roof size
- Place of tank
- Gutters & pipe routes
- Overflow location
Step 2 : Install Gutters & Screens
- Mount gutters flush with roof edge
- Add debris guards
- Ensure downpipes lead to tanks with minimal bends
Step 3 : First‑Flush System
Install a first‑flush diverter at the first point water leaves the roof.
DIY tip:
Use a vertical length of PVC ~60–80 cm with a removable cap. Install a small hole near the bottom to drain after every rain.
Step 4 : Connect to Tank
Use flexible hose or pipe clamps:
- Seal all joints
- Add a mosquito proof screen over tank inlet
Step 5 : Set Up Overflow
Direct overflow away from foundations – to a garden bed or soak pit.
Step 6 : Optional Pump & Filtration
- For garden use: a small submersible or surface pump
- For household use: booster pump with pressure tank
- Add final filters if using for laundry or toilets
4. Maintenance Tips
| Task | Frequency |
|---|---|
| Clean gutters/filters | Every 1–2 months |
| Check first‑flush diverter | After every big storm |
| Inspect tank lid & screens | Monthly |
| Flush out tanks | Annually |
Winter months (May–August) are critical in the Cape – prepare before the rains.
5. Common Mistakes & How to Avoid Them
- Under‑sized gutters: Water spills out – undersized means missed harvest.
Solution: Oversize gutters or add an additional downpipe. - No first‑flush diverter: Dirty water enters tank.
Solution: Must have for cleaner storage. - Poor tank placement: Hard to access or shade.
Solution: Place level, shaded if possible, and accessible. - No overflow management: Causes erosion or foundation damage.
Solution: Use gravel pits or directed drains.
6. What Can You Use Rainwater For?
✔ Garden watering
✔ Washing cars
✔ Filling washing machines (with proper filtering)
✔ Toilet flushing
✔ Livestock water
❌ Drinking (without advanced filtration and treatment)
7. Cost Breakdown (Estimate)
| Item | Range (ZAR) |
|---|---|
| Tanks (2,000–5,000 L) | R2,000 – R8,000 |
| Gutters & fittings | R800 – R2,000 |
| First‑flush diverter | R200 – R600 |
| Pumps | R1,000 – R4,000 |
| Filters & screens | R300 – R1,000 |
| Installation (DIY) | Free – R1,500 |
| Total | ~R4,000 – R15,000 |
8. Final Thoughts
DIY rainwater harvesting is achievable, affordable, and impactful — especially in the Western Cape where water security matters year‑round. Start small, expand as needed, and maintain regularly to get the best performance.